
Showing posts with label nail polish. Show all posts
Showing posts with label nail polish. Show all posts
Friday, 21 September 2012
Nailed: Essie Kisses and Bises Over Black

Friday, 14 September 2012
Nailed: OPI Mermaid's Tears with Your Royal Shine-ness

I absolutely love this mani, and didn't want to take it off! Definitely one I'll be repeating. OPI Mermaid's Tears (Pirates of the Carribean collection) with Your Royal Shine-ness (Serena Glam Slam) on the tips. Application was fine, tips were done with a small paintbrush, all smoothed out with a coat of Seche Vite. Removal was without issues :)
Wednesday, 12 September 2012
TK Maxx OPI Haul
Sorry to be coming up with so many nail related posts recently, I'm really trying to vary my content a bit more but I dont have much makeup with me at my temporary flat, just enough for 2 or 3 every day looks really, while I've got all of my nail stuff, so my nails have been getting a lot of my attention recently!
not long after I got back from Uganda I went shopping near my parents house on the Isle of Wight. TK Maxx has only recently come to the Island and is something of a novelty there! Obviously we have TK Maxx in London where I spend most of my time, but after nearly 3 months in the wilderness it seemed like a pretty exciting prospect!
I don't love shopping in TK Maxx for clothes, I find it kindof stressful and too much like a jumble sale, but for accessories and beauty products (and weirdly, ski wear) it doesn't bother me at all. I've never owned or even used an OPI polish before so I was pretty excited when I saw them!
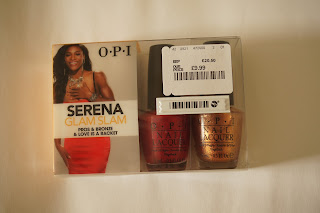
 I got two sets in the end, a trio, above, which was priced at £14.99, and a Serena Glam Slam duo, which was £9.99.
 The trio doesn't seem to be from any particular collection, the colours are, from left to right, Mermaid's Tears, which was from the Pirates of the Carribean collection, Shatter The Scales, which was from The Amazing Spider Man collection, and Your Royal Shine-Ness, which was from a different Serena Glam Slam duo! I really like the colours though, and it's nice to have some limited edition shades.
The colours in the Serena Glam Slam duo are Pros and Bronze (right), and Love is a Racket (left). Pros and Bronze is definitely my favourite out of these two, its just so interesting! its a really coppery tone, and on the nail has a bit of a pink colour shift! It's so pretty and striking, I couldn't stop looking at it when I was wearing it!

I was pretty pleased to get these at only £5 each rather than the usual price point of around £10. I like to change my polish often and although I like these, I don't think I could justify spending that much on one polish. If I saw them at this price again I would definitely buy more though!
not long after I got back from Uganda I went shopping near my parents house on the Isle of Wight. TK Maxx has only recently come to the Island and is something of a novelty there! Obviously we have TK Maxx in London where I spend most of my time, but after nearly 3 months in the wilderness it seemed like a pretty exciting prospect!
I don't love shopping in TK Maxx for clothes, I find it kindof stressful and too much like a jumble sale, but for accessories and beauty products (and weirdly, ski wear) it doesn't bother me at all. I've never owned or even used an OPI polish before so I was pretty excited when I saw them!


The colours in the Serena Glam Slam duo are Pros and Bronze (right), and Love is a Racket (left). Pros and Bronze is definitely my favourite out of these two, its just so interesting! its a really coppery tone, and on the nail has a bit of a pink colour shift! It's so pretty and striking, I couldn't stop looking at it when I was wearing it!
Saturday, 8 September 2012
Nailed: Barry M Neon Pink
I'm so sorry I've been MIA the past couple of weeks, I've been staying with a friend in London while I looked for a new flat/house to live in for my second year at uni, and I let my camera at my parents house. I've got it back now and found a house, thank God!
Anyway, recently I was in Tantrum in Westfield in Stratford, where they do nail art stuff, and recently seem to have added a lot more makeup and jewelry to their stock. They also do nail art for you in store, which I need to check out some time soon!
They had a big Barry M stand and seemed to stock the entire line of Barry M makeup. I was very excited about that as I have a bit of an obsession with Barry M Nail Paints, but I have the most popular ones which tend to be stocked at smaller stands! I found a few polishes that I don't already own, but it was the neons that really caught my eye, and I came away with Neon Pink and a blue nail art pen by Tantrum. I would link to their website but there isn't much of it, you can find their facebook page here
 Neon Pink is a really bright, almost, but not quite, highlighter pink. The thing that makes it slightly more interesting than a flat neon is that it has a very fine blue shimer to it, which accentuates its brightness. If you enlarge the photo the shimmer becomes much more apparent. It was opaque in 2 coats but I'm a 3 coat girl and used 3 for a perfect finish. One thicker coat could even have given adequate coverage.
Anyway, recently I was in Tantrum in Westfield in Stratford, where they do nail art stuff, and recently seem to have added a lot more makeup and jewelry to their stock. They also do nail art for you in store, which I need to check out some time soon!
They had a big Barry M stand and seemed to stock the entire line of Barry M makeup. I was very excited about that as I have a bit of an obsession with Barry M Nail Paints, but I have the most popular ones which tend to be stocked at smaller stands! I found a few polishes that I don't already own, but it was the neons that really caught my eye, and I came away with Neon Pink and a blue nail art pen by Tantrum. I would link to their website but there isn't much of it, you can find their facebook page here

Monday, 30 July 2012
Bow Manicure from The Illustrated Nail
This is super old, but I just realised that I never posted it! A few months ago, a new Lola and Grace store opened at Westfield Stratford, and had loads of things going on the day they opened. There was champagne and cupcakes, a jewelry swap, free manicures and a DJ and party in the evening I think.
My friend Leonie and I went to check it out, and we arrived just as the girls from The Illustrated Nail turned up! We booked in for the first appointment and went to shop while they got set up. When we came back there was a huge queue, but as we had booked in we got to slot right in! She created a beautiful bow design on my nails and used Essie Mint Candy Apple as a base colour. I wish I had the skills to do nail art like this!

My friend Leonie and I went to check it out, and we arrived just as the girls from The Illustrated Nail turned up! We booked in for the first appointment and went to shop while they got set up. When we came back there was a huge queue, but as we had booked in we got to slot right in! She created a beautiful bow design on my nails and used Essie Mint Candy Apple as a base colour. I wish I had the skills to do nail art like this!

Monday, 23 July 2012
Nailed: Essie Sole Mate

Thursday, 19 July 2012
TK Maxx and Boots Beauty Haul!
Sorry to be psoting another haul so soon, but at the time of writing this I'm running around trying to get everything sorted to leave for Uganda, which is in less than a week now! By the time this goes out I will have been there for over a month and will hopefully be having a great time! Anyway, I've been doing a lot of shopping to get essientals for going away, and I couldnt resist getting a couple of new beauty purchases too!

My friend Charlotte tipped me off that TK Maxx had quite a lot of Stila products, so I went to check it out. They didn't actually have all that many Stila products, only a couple of Lip Glazes and a mascara that had been opened by an inconsiderate shopper. I did manage to get a lipgloss though, a Lip Enamel Luxe Gloss in Euphoria, which is a dark, blue toned pink. These glosses contain 3.8ml of product, which is quite a bit more than cult favourite lip glazes, which only contain 2.4ml. I think this particular line of glosses may have been discontinued, as I cant find it on the UK website. I was able to find it on the US site though. The TK Maxx price for this was only £3.99, a total bargain compared to its $22 reccomended price, which is about £14.30.
Also at TK Maxx I spotted several different trios of Essie polishes. These are the original formula I think, not the new, slightly cheaper diffusion formula. They were priced at £10 for the set. I have no idea what the colours are though, they are marked as Capri, Tangerine and Tangerine, but having googled these none of them are right! if anybody knows what they might be, let me know! Lastly from TK Maxx I picked up Sally Hansens Healthy Cuticles Now! which was £3.99.
Next I headed over to Boots where I picked up a polish from the new Essie Diffusion line, in Sole Mate (£7.99, here) which is a beautiful blackened plum shade. I also got Shadow Insurance from Too Faced, which I have never tried before, but I am in desperate need of a decent eyeshadow primer! (£14.03, here)
Lastly I popped to H&M where I bought this iPhone 4 case for just £2.99! Ive been looking for a completely plain case that wouldnt break the bank for ages, as I want to cover it in completely offensive glitter and sparkles. I like tacky, so shoot me!


My friend Charlotte tipped me off that TK Maxx had quite a lot of Stila products, so I went to check it out. They didn't actually have all that many Stila products, only a couple of Lip Glazes and a mascara that had been opened by an inconsiderate shopper. I did manage to get a lipgloss though, a Lip Enamel Luxe Gloss in Euphoria, which is a dark, blue toned pink. These glosses contain 3.8ml of product, which is quite a bit more than cult favourite lip glazes, which only contain 2.4ml. I think this particular line of glosses may have been discontinued, as I cant find it on the UK website. I was able to find it on the US site though. The TK Maxx price for this was only £3.99, a total bargain compared to its $22 reccomended price, which is about £14.30.
Also at TK Maxx I spotted several different trios of Essie polishes. These are the original formula I think, not the new, slightly cheaper diffusion formula. They were priced at £10 for the set. I have no idea what the colours are though, they are marked as Capri, Tangerine and Tangerine, but having googled these none of them are right! if anybody knows what they might be, let me know! Lastly from TK Maxx I picked up Sally Hansens Healthy Cuticles Now! which was £3.99.
Next I headed over to Boots where I picked up a polish from the new Essie Diffusion line, in Sole Mate (£7.99, here) which is a beautiful blackened plum shade. I also got Shadow Insurance from Too Faced, which I have never tried before, but I am in desperate need of a decent eyeshadow primer! (£14.03, here)

Thursday, 12 July 2012
Nailed (Properly this time!): Shock.
Finally I got around to trying Shock by LA Colors with a white base. It's MUCH better, but also MUCH more labour intensive. I had to do 2 coats of NYC white, and then about 5 coats of Shock.


With white base

Without white base
Thursday, 21 June 2012
Nailed: French Gradient with Tutorial

The steps are really very easy, but I'll go through them anyway. You're going to need a nude nail polish, I used Maybelline Everstrong in Ivory Rose (£4.09, here), a base coat, I used Save the Nail Repair and Rescue Base coat as my nails are quite weak (£7.50, here), a french white polish, I'm using Collection 2000 French Manicure in French White (£2.99, availbile from Boots and Superdrug, but irritatingly not online) and a topcoat. I'm using Seche Vite Dry Fast Topcoat (£10.50, here), a nail file and/or buffer, a makeup sponge and some sort of non-porus surface, I just use old packaging.

Apply your nude polish, using enough coats for it to be opaque, though if your nail line shows it doesn't matter too much.

Using a matte topcoat can make the gradient even more fuzzy and soft looking, it's a really pretty effect.

Thursday, 14 June 2012
Nailed: Lilac Charm

This polish is from the Maybelline Forever Strong line (£4.09, here) application and removal were without problems.

Wednesday, 6 June 2012
Nailed: Shock.
Since the weather has finally warmed up, I've been able to crack out the summer brights!
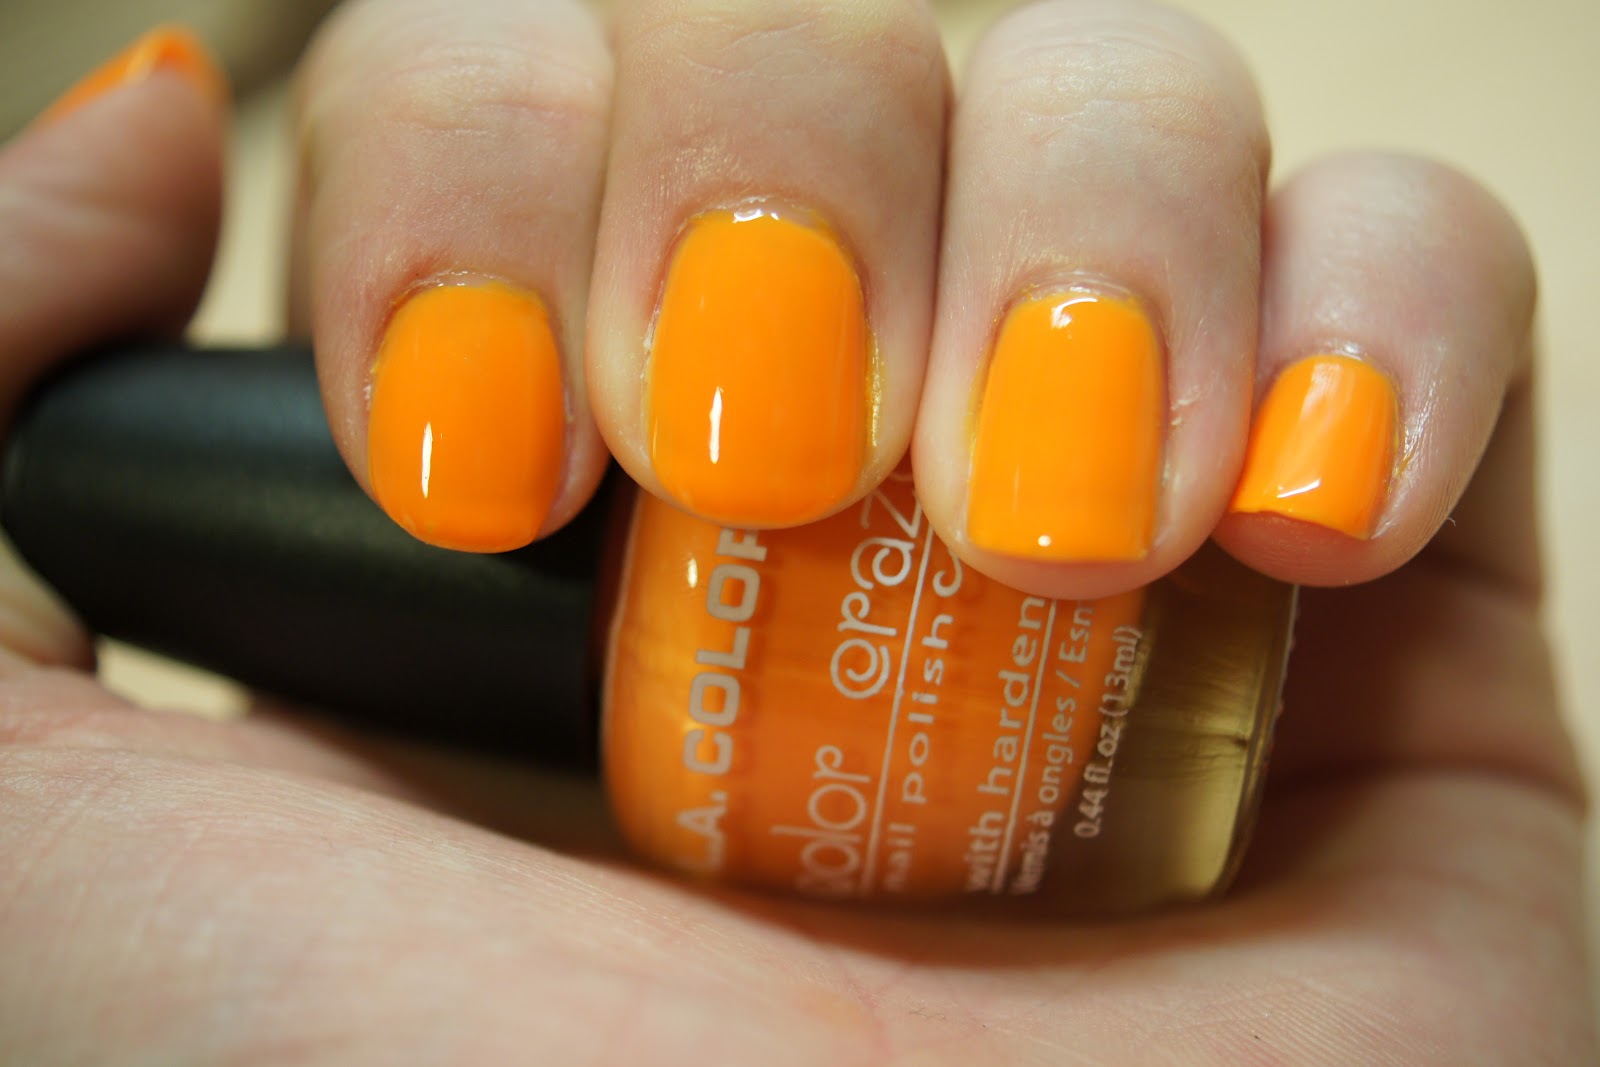
This is by LA Colors from their Color Craze line in the shade Shock. I got this for the bargainous price of £1 from Beauty Base in Westfield Stratford.
 The formula was not great. For a £1 polish, I didn't expect great things, but the other polishes I have from this line have had much better formulas, so maybe I've been spoilt by them in the past. This polish was really very sheer, the abover photo is with 5 coats, and my nail line was still visible. The colour is lovely, but if i was going to use this again I think I would try it over a white base. Overall it's not a bad polish, but be prepared to have to work quite hard to get it to look like the bottle. Removal was without problems.

This is by LA Colors from their Color Craze line in the shade Shock. I got this for the bargainous price of £1 from Beauty Base in Westfield Stratford.

Monday, 4 June 2012
Some New Things...
My aforementioned shopping extravaganza did not end with Primark hair accessories, so I thought I'd share.


Sunglasses. I used to have absolutely loads of pairs of sunglasses, and then I went to Tanzania, and then I went to Uganda. The kids there are compleely obsessed with them, so I came back from Tanzania with none of the sunnies that I'd taken with me, but still some left at home. When my trip to Uganda came around the following summer, I took all of my remaining pairs (six in total!) and I came back with only one pair. (see evidence of adorable sunglasses theives below). So, having learned my lesson, I decided tostart stocking up on cheap sunnies from Primark. These were only £2 each and offer full UV protection, which is important. The super pretty Cath Kidston-esque sunglasses case was only £1.50 too!


The two Maybelline Forever Strong nail polishes were impulse buys really, but I really love the colours. they are Ivory Rose and Lilac charm.
Lastly I got a new foundation from Bobbi Brown (review coming soon!). It's a different forula to the one I used to use, and is supposed to be long wearing and is oil free. We shall see!
Wednesday, 30 May 2012
Recent Empties
I have never done a post like this before, but I'm always interested to see what other bloggers are using or have used up, and whether they would repurchase or not, so here goes!
 First up is my Bobbi Brown Skin Foundation SPF 15 in shade 0, Porcelain (£29, here). when I first bought this foundation I was delighted simply because I had found a foundation that was pale enough to be a true match. However, it really wasn't all that appropriate for my skintype (as mentioned in my foundation routine post, here) and was transferring and smudging in my T-zone area after only a couple of hours wear. I began using it as a base for apowde foundation, which was marginally more successful and so I have used it up. I would not repurchase this formulation again but I would definitely purchase another formula from the same brand, as i think they are great quality and you can't fault the shade range.
Next is my Collection 2000 Lasting Perfection Concealer in shade 1, light. (£4.19, here) As you might know this is my asolute HG concealer and I already have a new one on standby.
The nail polish remover is something of a staple for me and I buy it regularly. This particular one actually came from Poundland and was really great because it had a flip-top cap with a very small opening, which meant that you didnt loose anywhere near as much through evaporation when it was open, and it was easy to open with one hand (great for when using the foil method of removing glitters!) unfortunately I havent been able to get another bottle of this from Poundland, but I have managed to track some down on Amazon, for the princely sum of £4.38! It's not as good value as Poundland, but it's still a very effective nail plish remover. You can find it here.
MAC Brush Cleanser (£8.50, here). This was my first bottle and I already have a backup ready to take it's place (actually I've had it for weeks!) it lasted much longer than I expected and I've found it really effective.
Lastly is this little sample-sized pot of Seaweed Mattifying Day Cream (Full size £9.00, here) by The Body Shop. I got this in a little sample set with 3 other products from the seaweed line ages ago, and only recently got around to trying it. I LOVE this, it moisturised my skin without leaving it oily, and contains dimethicone so it also makes a great primer. The little pot also lasted quite a while but it's now completely exhausted. Unfortunately this has been out of stock in the five, yes FIVE stores I have been to, and is out of stock online too! Please, The Body Shop, get this back in stock!! I need it in my life!

Next is my Collection 2000 Lasting Perfection Concealer in shade 1, light. (£4.19, here) As you might know this is my asolute HG concealer and I already have a new one on standby.
The nail polish remover is something of a staple for me and I buy it regularly. This particular one actually came from Poundland and was really great because it had a flip-top cap with a very small opening, which meant that you didnt loose anywhere near as much through evaporation when it was open, and it was easy to open with one hand (great for when using the foil method of removing glitters!) unfortunately I havent been able to get another bottle of this from Poundland, but I have managed to track some down on Amazon, for the princely sum of £4.38! It's not as good value as Poundland, but it's still a very effective nail plish remover. You can find it here.
MAC Brush Cleanser (£8.50, here). This was my first bottle and I already have a backup ready to take it's place (actually I've had it for weeks!) it lasted much longer than I expected and I've found it really effective.
Lastly is this little sample-sized pot of Seaweed Mattifying Day Cream (Full size £9.00, here) by The Body Shop. I got this in a little sample set with 3 other products from the seaweed line ages ago, and only recently got around to trying it. I LOVE this, it moisturised my skin without leaving it oily, and contains dimethicone so it also makes a great primer. The little pot also lasted quite a while but it's now completely exhausted. Unfortunately this has been out of stock in the five, yes FIVE stores I have been to, and is out of stock online too! Please, The Body Shop, get this back in stock!! I need it in my life!
Friday, 25 May 2012
Nailed; Ivory Rose
I think I've found my perfect nude polish! I first saw this on Makeup Savvy and as soon as I saw it I knew I had to have it! I got it in Superdrug where I took advantage of their current 3 for 2 on all cosmetics offer.
 It's from the Maybelline Forever Strong line and I absolutely love it. It's much more peachy than my other nude polish, which is from the same line but is the shade Rose Poudre. I think this is a great nude for fair skin as it doesn't make your hands look 'dead' or make them look red, which can happen with some nudes. I think it would look nice with a glitter topcoat too, if you wanted to liven it up a bit.

Friday, 11 May 2012
Gradient Manicure Barry M Racing Green with Nicole by OPI Glitter in my Stocking
Today I did this gradient manicure with two new polishes that I recently acquired. The Barry M Racing Green I've had my eye on for ages, I don't know why I didn'y get it earlier really, these polishes have such reliably good formulas and they certainly don't break the bank at £2.99. The glitter polish I recieved in my swap with Marla, but I forgot to include it in my swap haul! (D'oh!)


It's such a pretty colour, and the glitter is really dense, I've used it for an alternative french tip colour and it's absolutely gorgeous with that paired with Barry M Peach Melba. for this manicure however, I applied it with a tiny brush and dragged it down towards the base of my nail of a gradient effect.

Wednesday, 11 April 2012
DIY Kaviar Manicure tutorial
hey girls! sorry ive been so absent lately, but I've got lots of content coming soon, like a haul from a swap i did with Marla!
anyway, today I had a bit of fun with my nails. I had actually done this before, but used a topcoat on top which caused the colours to run an look super ugly! I have seen a lot about the Ciate Caviar Manicure kits that have recently gone on sale, and I was excited but also kindof annoyed about it. The pricetag for the kits, (which is the princely sum of £18!) is a bit ridiculous in my humble opinion. I was excited because it's a relatively new turn for nail art (though i'm sure quite a few people have tried this before, myself included) but the kits include a bottle of polish, a bottle of microbeads (or 'caviar pearls' as I think they have dubbed them) a funnel and a plastic tray.


 You will need:
Nail polish. I used Barry M nail paint in Peach Melba, but you can use any colour you fancy!
Microbeads. mine are Micro Beedz by Art Accentz, which I got from a shop called Crafty Destination in Southampton. They are by far the cheapest I have found, at £1 a pot or £4.99 for a pack of six different colours. They have a website, which you can find here. I also mixed the colours you see above in the small pot on the left. This gives a more dimensional look, but you could just use one colour.
Some sort of scoop. The one I used is from a pack of sweets from topshop, but a teaspoon will do fine!
A piece of paper, or a paper plate. I folded the edges of the paper to make a kind of tray so I could save any stray beads that didn't stick to the nail.
A topcoat. This is optional, but I used Seche Vite to actually stick the beads down, because it can stand a thick coat and dries quickly, though you could just use your coloured polish if you wish.
Right, the first thing ou need to do is paint your nails. I just wanted to do one accent nail on each hand, but you could do all of them. Decide which nail/s you are going to apply the beads to.
Take your seche vite, and apply to one nail. Very quickly, spoon some beads over the nail and tap them down. You will want to have the containers already open and the spoon at hand to do this! Work over your paper tray or plate.
Continue until all of your nails are done! its really that simple. Then you can crease your paper tray or plate in the middle, and use it to pour the remaining beads back into the pot. This look isnt very hard wearing, but should last a few days if you're careful with it!
 the finished look.
would anybody be interested in seeing a tutorial for how i made my phone case?
enjoy!
anyway, today I had a bit of fun with my nails. I had actually done this before, but used a topcoat on top which caused the colours to run an look super ugly! I have seen a lot about the Ciate Caviar Manicure kits that have recently gone on sale, and I was excited but also kindof annoyed about it. The pricetag for the kits, (which is the princely sum of £18!) is a bit ridiculous in my humble opinion. I was excited because it's a relatively new turn for nail art (though i'm sure quite a few people have tried this before, myself included) but the kits include a bottle of polish, a bottle of microbeads (or 'caviar pearls' as I think they have dubbed them) a funnel and a plastic tray.
I think it's expensive for what it is. I have a large number of different colours of microbeads that I bought ages ago to make a blinged out iphone case.

I have 14 different colours of beads, and together they cost less than a Ciate kit! So here is a quick DIY tutorial on how to get the look, without breaking the bank!

Nail polish. I used Barry M nail paint in Peach Melba, but you can use any colour you fancy!
Microbeads. mine are Micro Beedz by Art Accentz, which I got from a shop called Crafty Destination in Southampton. They are by far the cheapest I have found, at £1 a pot or £4.99 for a pack of six different colours. They have a website, which you can find here. I also mixed the colours you see above in the small pot on the left. This gives a more dimensional look, but you could just use one colour.
Some sort of scoop. The one I used is from a pack of sweets from topshop, but a teaspoon will do fine!
A piece of paper, or a paper plate. I folded the edges of the paper to make a kind of tray so I could save any stray beads that didn't stick to the nail.
A topcoat. This is optional, but I used Seche Vite to actually stick the beads down, because it can stand a thick coat and dries quickly, though you could just use your coloured polish if you wish.
Right, the first thing ou need to do is paint your nails. I just wanted to do one accent nail on each hand, but you could do all of them. Decide which nail/s you are going to apply the beads to.
Take your seche vite, and apply to one nail. Very quickly, spoon some beads over the nail and tap them down. You will want to have the containers already open and the spoon at hand to do this! Work over your paper tray or plate.
Continue until all of your nails are done! its really that simple. Then you can crease your paper tray or plate in the middle, and use it to pour the remaining beads back into the pot. This look isnt very hard wearing, but should last a few days if you're careful with it!

would anybody be interested in seeing a tutorial for how i made my phone case?
enjoy!
Sunday, 27 November 2011
First Festive Manicure of the Season!
hey ladies! just a quick post to show you todays manicure!
I bought Barry M's red glitter a while back to use as a topcoat over a taupe colour that i thought needed spicing up a bit. It was totally useless for that purpose because it is virtually opaque. I was a bit dissapointed with it for that reason but i have since come to realise that opaque glitters are really something of a rarity! This shade just seemed so perfect for the Christmas season, so I thought I'd crack it out again.
 products used: Save the Nail Repair and Rescue Treatment (not pictured) (here), NYC In a New York Colour Minute Quick Dry Nail Polish in Chelsea (here), Barry M Nail Paint in 150 Red Glitter (here) and Seche Vite Topcoat (here)
 with flash. please enlarge to view the beautiful sparkles!!!
 without flash.
so what do YOU think? is it too early for christmas nails?
Love, Lucy xx
I bought Barry M's red glitter a while back to use as a topcoat over a taupe colour that i thought needed spicing up a bit. It was totally useless for that purpose because it is virtually opaque. I was a bit dissapointed with it for that reason but i have since come to realise that opaque glitters are really something of a rarity! This shade just seemed so perfect for the Christmas season, so I thought I'd crack it out again.


so what do YOU think? is it too early for christmas nails?
Love, Lucy xx
Monday, 24 October 2011
DIY leopard print nails
hey ladies, today i'm coming to you with a tutorial, to create these awsome leopard print style nails!
 once you've decided on your colour scheme, (im using pink and blue but mot colour combinations would work!) the first step is to paint your base coat and base colour. i didn't actually do a base coat because i've got acrylics at the moment, but if you're doing this look on your natural nails, a base coat will help it last longer and be smoother. i'm using Barry M's Blue Moon as my base colour.
 after you've got your base colour down, you need to get a contrasting colour (i'm using Barry M's Pink flamingo) and get your splodge on! try not to dab straight down as this will leave little drops and bumps, its better to do a little stroke of the brush. don't worry about being neat, different sizes and shapes are good!
 having done your contrasting splodges, you need to get your hands on a back liquid eyeliner. i'm using liquid eyeliner rather than black polish for a few reasons; 1, its much easier to fix if you make a mistake and you don't have to start again with polish remover. 2, i find it's much more opaque than the black polish i have and 3, the fine brush makes it easier to apply than a polish brush.
the eyeliner i'm using is Sleek's dip it eyeliner in black. it has a 'felt tip' style brush, which i much prefer to the floppier bristle brush ones. you need to draw broken lines around each dot, two or three for each one. if you have any bare patches on your nail, you can also draw on some little 'c' shapes to fill them in.
 lastly you need to seal in your design with a topcoat. i'm using Seche vite fast dry topcoat.
it helps to look at a picture of a leopard to see how the 'rosettes' look (which is what we're trying to recreate). i'm lucky enough to have a little leopard living at my parents house, so i took my inspiration from him :)
 hope you liked this tutorial lovelies!
let me know your ideas for other colour combinations, i want to try them out!
Love, Lucy xxx


the eyeliner i'm using is Sleek's dip it eyeliner in black. it has a 'felt tip' style brush, which i much prefer to the floppier bristle brush ones. you need to draw broken lines around each dot, two or three for each one. if you have any bare patches on your nail, you can also draw on some little 'c' shapes to fill them in.

it helps to look at a picture of a leopard to see how the 'rosettes' look (which is what we're trying to recreate). i'm lucky enough to have a little leopard living at my parents house, so i took my inspiration from him :)

let me know your ideas for other colour combinations, i want to try them out!
Love, Lucy xxx
Friday, 21 October 2011
Thinking of getting gel nails?
hey lovlies, today i come to you with something of a rant.
a few weeks ago now, while i was off blogging because i was settling into uni, one of my first wednesday adventrues with my flatmate danni was to go and get our nails done before going shopping at the new westfield stratford city.
we found a nail bar near to westfield (not naming any names here)and went in to look at their treatment list. i had already decided i wanted to get gels, bacause i'd had acrylics in the past and they had ruined my nails. gels have a reputation for being less damaging and slightly more versatile.
when i entered the salon it seemed fine, offering mainly nail treatments but also waxing and massage in a slightly dodgy looking back room. as i was there for my nails though, i wasn't too bothered. i asked for gels (which were listed in their treatments, and were about £7 more than acrylics) and she whipped out a pot of powder. straight away i smelled a rat, gels should surely be a GEL right? i said 'isnt that acrylic?' and she replied in her limited english that it was a new thing, 'powdered gel'. i have never had gels before so i went along with it. how was i to know that it wasnt a new thing? she also got out a glass dappen dish and filled it with familliar looking purple liquid. after some drilling (!) she stuck on some nail tips and then she applied the substance (as i will be calling it from now) with apparent expertise, and when she had finished she instructed me to hold my hand in front of a mini fan mounted on the desk to dry it. this is when i started to get more suspicious. i texted danni who was sitting next to me that i was SURE she was applying acrylics to my nails, but i really wasn't sure what i could do about it now that i was in the chair with the stuff already on me!
the reason i was so suspicious was because there was no UV light used to cure the 'gel', and it smelled exactly like the acrylics i have had in the past. when she had finished i paid my money and left, unsure what else i could do. when i got home i did some googling, and found out that lots of people have been conned by this sort of thing, and i did indeed get acrylics. i was and am so angry about this, and it has put me off ever getting treatments done again.
the fact that she used a nail drill which will have done untold damage to my natural nails and was pysically painful at the time; she wasnt very carful with where she was putting it, and caught my skin several times. and also that i'm not going to have to go to another salon to get them removed ( i would do it myself but she told me they were file off; i dont believe her but i dont want to damage my nails any further by soaking in acetone unnescesarily).
i dont really know what the purpose of this rant was other than to warn people. if you go to get gels, make sure you look up the salon beforehand and if you think it's not what ou asked for, get up and leave!!
 the offending talons (re-shaped and re-painted by me with 17 Magnetized nail polish, 'the green one')
a few weeks ago now, while i was off blogging because i was settling into uni, one of my first wednesday adventrues with my flatmate danni was to go and get our nails done before going shopping at the new westfield stratford city.
we found a nail bar near to westfield (not naming any names here)and went in to look at their treatment list. i had already decided i wanted to get gels, bacause i'd had acrylics in the past and they had ruined my nails. gels have a reputation for being less damaging and slightly more versatile.
when i entered the salon it seemed fine, offering mainly nail treatments but also waxing and massage in a slightly dodgy looking back room. as i was there for my nails though, i wasn't too bothered. i asked for gels (which were listed in their treatments, and were about £7 more than acrylics) and she whipped out a pot of powder. straight away i smelled a rat, gels should surely be a GEL right? i said 'isnt that acrylic?' and she replied in her limited english that it was a new thing, 'powdered gel'. i have never had gels before so i went along with it. how was i to know that it wasnt a new thing? she also got out a glass dappen dish and filled it with familliar looking purple liquid. after some drilling (!) she stuck on some nail tips and then she applied the substance (as i will be calling it from now) with apparent expertise, and when she had finished she instructed me to hold my hand in front of a mini fan mounted on the desk to dry it. this is when i started to get more suspicious. i texted danni who was sitting next to me that i was SURE she was applying acrylics to my nails, but i really wasn't sure what i could do about it now that i was in the chair with the stuff already on me!
the reason i was so suspicious was because there was no UV light used to cure the 'gel', and it smelled exactly like the acrylics i have had in the past. when she had finished i paid my money and left, unsure what else i could do. when i got home i did some googling, and found out that lots of people have been conned by this sort of thing, and i did indeed get acrylics. i was and am so angry about this, and it has put me off ever getting treatments done again.
the fact that she used a nail drill which will have done untold damage to my natural nails and was pysically painful at the time; she wasnt very carful with where she was putting it, and caught my skin several times. and also that i'm not going to have to go to another salon to get them removed ( i would do it myself but she told me they were file off; i dont believe her but i dont want to damage my nails any further by soaking in acetone unnescesarily).
i dont really know what the purpose of this rant was other than to warn people. if you go to get gels, make sure you look up the salon beforehand and if you think it's not what ou asked for, get up and leave!!

Wednesday, 19 October 2011
Current Things i'm lusting over...
With christmas coming up, i wanted to do a little post talking about what i'm currently lusting over, and somethings that i'm hoping might appear in my stocking!!


- The first thing I would really love to recieve this christmas is a subscription to Glossybox. i have seen so many posts on them recently and while at first i thought that it was a lot of money for samples you could usually get for free, having read reviews i'm desperate to get my hot and stickies on one!!

- A ticket to London IMATS. ive never been, and this is the number one thing i want to do next year, even before going to India.
- M.A.C. i dont actually own anything from MAC, despite an attempt to purchase one of their foundations (post here) and i particularly want to try some of their brushes and lipsticks. an essential brush that is missing from my kit is a fluffy round brush, so i'll be asking for one of those!

- A brush kit. while i have quite a selection of brushes, i don't have any high quality brushes and i would sell my granny for this set from sigma. (not literally, granny, but i do REALLY want them!)
- an oversized locket. a beautiful antique one would be amazing, but this particular one is lovely too and is actually from Argos.
- the Let it Snow! collection from China Glaze. specifically blue years eve, glittering garland, ring in the red, snow globe and tinsel town. over on Scrangie there are some brilliant swatches which really showcase how beautiful these shades are.

- i'm running out of my beyonce Heat perfume, so i'm after a new bottle of that, and i got a sample of her new scent, Pulse, and i'm in love with it, so i would love to recieve one of those too!
- my benefit Something about Sofia (along with beyonce heat) is my signature scent but because the bottle is opaque, i don't know if it's running out! i think it is though, so this is on my list of stuff to buy as soon as i have money!


a non-beauty related thing on my lust list is a macro len for my camera. i have the Sony Alpha A500 (can't reccomend it enough!) which i love, but the lenses i have don't allow me to get very close up, which is the style of photography i enjoy the most. as a bonus, this is one of the cheapest lenses made my sony i have seen!
the last (and slightly wierd) thing on my list is a pizza tray! when i was living at home i cooked a lot but i was used to having a very well stocked kitchen with lots of gadgets, 2 ovens and 7 hob plates! since moving to uni i have had to adjust to having little equipment, an electric hob (nightmare!!) and a small crappy oven. one of the things i didnt think of when i was buying my kitchen stuff was a pizza tray and i have to regularly borrow my flatmates one, which he is starting to get fed up with!
what's on YOUR lust list at the moment? was there anything you forgot to bring to uni?
xxxx
Subscribe to:
Posts (Atom)