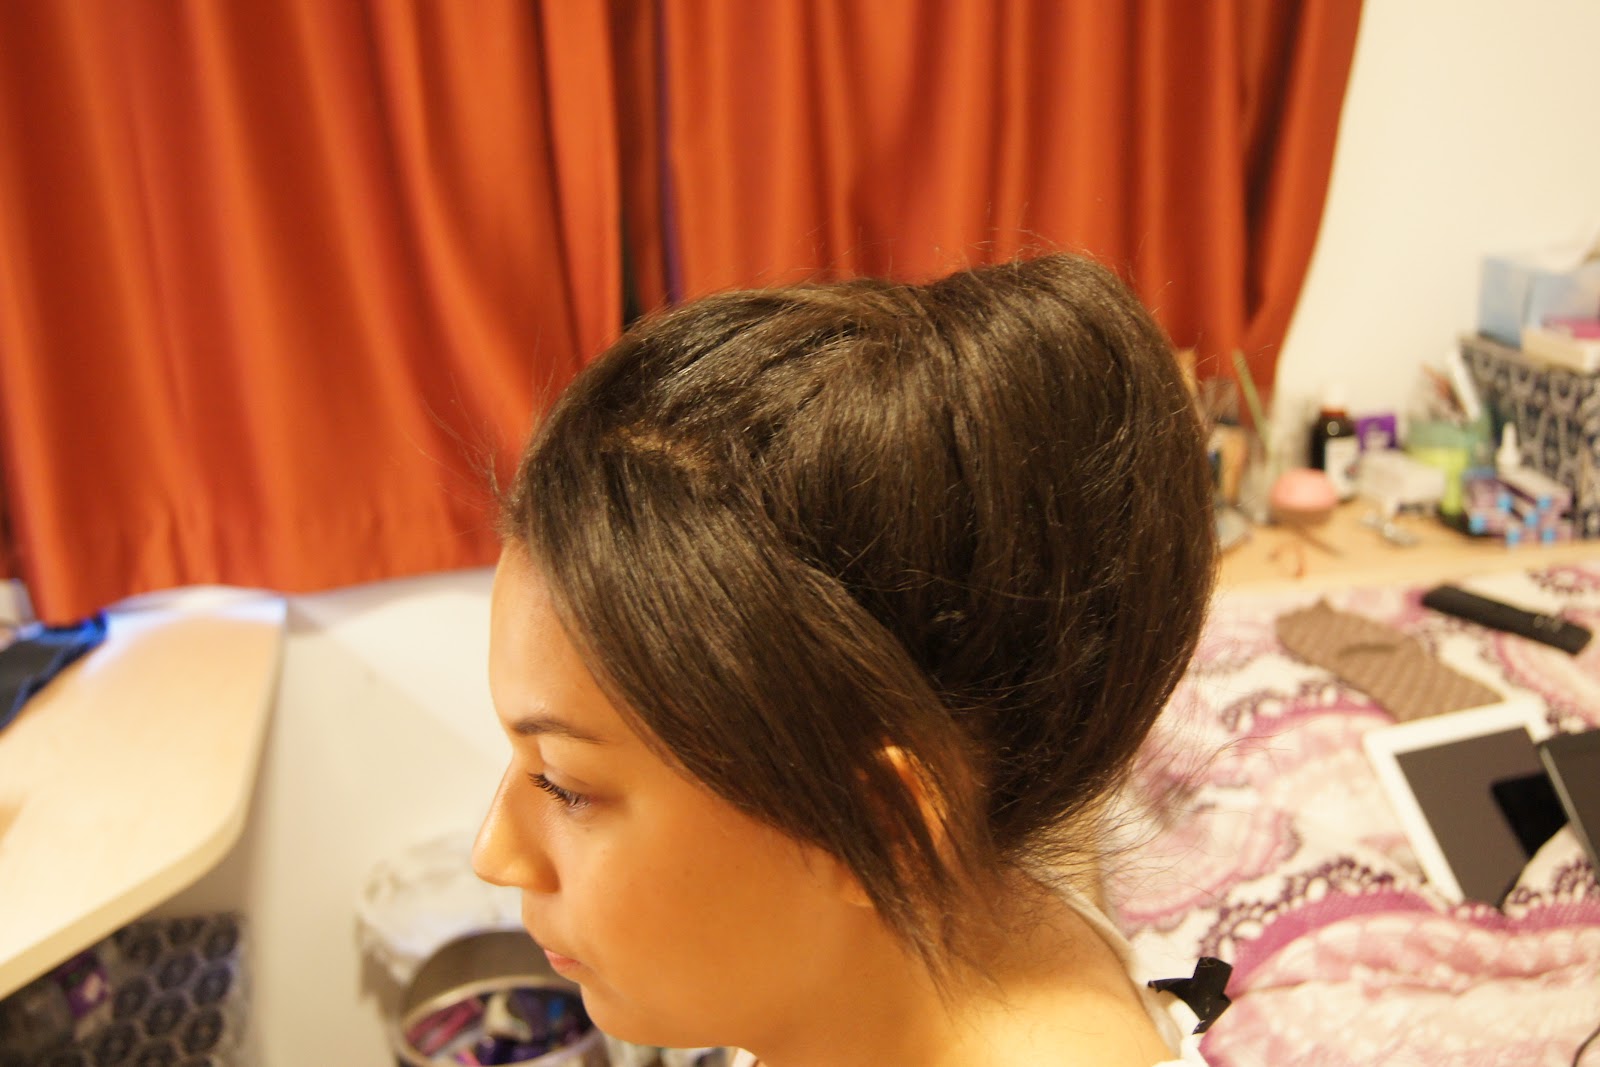
When I'm busy doing something, like taking notes in a lecture or bloogging, I always want to keep my hair out of my face. This is a cute a simple style that you can use to pull all of your hair back so it isn't in your face, or you can leave some bits down at the sides and front, and leave it looking a bit messier. You can do this look with normal pins very easily, but I wanted to show how these spiral pins are used.
Again, thankyou to Leonie for lending me her hair for this post!
For this look all you need is your spiral pins (£1 from Primark, for 2) or Goody Spin Pin (£5.50 for 2, here), and a brush. I use a Tangle Teezer (£10.99, here) but any brush will do.
The first thing you need to do is brush your hair out, and then pull it into a high ponytail, using a brush to keep your hair sleek and to make sure there are no bumps. If you are going for a more relaxed, messy look then you can just pull it back with your fingers.
Twist the hair firmly at the base, to anchor it in place. Twist the remainder of the ponytail and wrap it around the base until it is all used up. Tuck the end of the ponytail underneath the bun.
Grab one of your pins, and literally screw it into the bun from the side closest to your neck. You will get a much more firm hold if you push down on the top of the bun as you do this, and try and keep the pin as close to your scalp as possible. Screw the other pin in from the side closest to your forehead, again pressing down on the top of the bun. They warn you on the packaging not to interlock the two pins, as it will tangle your hair, but when I interlocked them accidently nothing bad happened, they just unscrew the same as before!
And you're done! You could spray some hairspray on your hands and use them to smoothe any flyaways that you might have if you need to.
Showing posts with label easy. Show all posts
Thursday, 5 July 2012
Thursday, 28 June 2012
Hair Series: Ladder Braid
This style is really nice for summer, and it's also great for disguising second day hair. I'll be in Uganda when this is published and will probably be wearing this quite a lot!
In order to recreate this, you do need to be able to do a simple French braid. If you can Dutch braid, then that will work too, though it will give a slightly different look.
start with a small section of hair over one temple. Braid/plait it normally through 2 cycles.
Start French braiding along the hair line, untill you reach the ear.
Once you get to the ear, the braid will be converted into what's called a half laced French braid, but very loosely. The way you do this is by adding hair as you normally would in a French braid to the side of the braid opposite the ear, but braiding normally and not adding any hair to the side nearest the ear. It's important to keep the sections loose as you add them, or the braid will start to wrap around the head, and you are aiming for the braid to fall straight down over the shoulder.
Secure the end of the braid with a clear elastic, and then use your fingers to pull it outwards, making it wider and a bit messy. You can do this all the way up the head, back to the start point, for a really dressed-down look.
In order to recreate this, you do need to be able to do a simple French braid. If you can Dutch braid, then that will work too, though it will give a slightly different look.
start with a small section of hair over one temple. Braid/plait it normally through 2 cycles.
Start French braiding along the hair line, untill you reach the ear.
Once you get to the ear, the braid will be converted into what's called a half laced French braid, but very loosely. The way you do this is by adding hair as you normally would in a French braid to the side of the braid opposite the ear, but braiding normally and not adding any hair to the side nearest the ear. It's important to keep the sections loose as you add them, or the braid will start to wrap around the head, and you are aiming for the braid to fall straight down over the shoulder.
Secure the end of the braid with a clear elastic, and then use your fingers to pull it outwards, making it wider and a bit messy. You can do this all the way up the head, back to the start point, for a really dressed-down look.
Monday, 25 June 2012
Hair Series: Hair Up, No Pins or Bands
I have been wanting to do a hair series for a while, as I love coming up with different styles, but styling your own hair and taking pictures of it at the same time was virtually impossible! Thankfully my lovely friend Leonie let me borrow her hair so that I could get some decent step-by-step shots
Anyway, onto the style! I quite often need to get my hair out of my face, but don't have anything to secure it with. This style is something I just tried once when I was learning how to create a french twist, and I have been using it since! It's super useful and unusual, people are constantly asking me how to do it, so I thought I'd share.
The first thing you need to do is gather your hair in a ponytail fairly high on your head. You can do this at virtually any height but I think higher tends to look better.
Twist the hair, and wrap it around itsself into a bun. It doesn't matter if it isn't neat, or if you have layers that stick out, as this is all going to get tucked underneath. The most important thing at this point is to make sure that there is a fairly equal amount of hair on each side.
Now comes the hard to explain and hard to photograph part! Holding onto the bun, use two fingers to make a hole above it. When I'm doing this on myself, I keep my wrists together underneath the bun, pointing towards my neck, and then my hands cup it and make the hole at the front, towards my forehead. To give you an idea of perspective as this photo is at something of an awkward angle, the little bit of skin you can see in the bottom corner is Leonie's temple.
Now, holding the hole open, use the heels of your hands to push the bun up and over into the hole. This can pull a little bit, but it gets easier (and less painful!) with practise.
Push any loose strands down into the hole, and if you need to make it more secure, you can roll more hair inwards into the hole.
I hope that I explained everything enough! If you just start experimenting it might start to make more sense!
Anyway, onto the style! I quite often need to get my hair out of my face, but don't have anything to secure it with. This style is something I just tried once when I was learning how to create a french twist, and I have been using it since! It's super useful and unusual, people are constantly asking me how to do it, so I thought I'd share.
The first thing you need to do is gather your hair in a ponytail fairly high on your head. You can do this at virtually any height but I think higher tends to look better.
Twist the hair, and wrap it around itsself into a bun. It doesn't matter if it isn't neat, or if you have layers that stick out, as this is all going to get tucked underneath. The most important thing at this point is to make sure that there is a fairly equal amount of hair on each side.
Now comes the hard to explain and hard to photograph part! Holding onto the bun, use two fingers to make a hole above it. When I'm doing this on myself, I keep my wrists together underneath the bun, pointing towards my neck, and then my hands cup it and make the hole at the front, towards my forehead. To give you an idea of perspective as this photo is at something of an awkward angle, the little bit of skin you can see in the bottom corner is Leonie's temple.
Now, holding the hole open, use the heels of your hands to push the bun up and over into the hole. This can pull a little bit, but it gets easier (and less painful!) with practise.
Push any loose strands down into the hole, and if you need to make it more secure, you can roll more hair inwards into the hole.
I hope that I explained everything enough! If you just start experimenting it might start to make more sense!
Thursday, 21 June 2012
Nailed: French Gradient with Tutorial
Today I decided to do something a little bit different with my nails. I like the classic french manicure but I sometimes think it can look a little bit too prefect, and I know a lot of people think it can look tacky (though personally I like it!). This look is softer and is inherently easier than doing your own french manicure as well!
The steps are really very easy, but I'll go through them anyway. You're going to need a nude nail polish, I used Maybelline Everstrong in Ivory Rose (£4.09, here), a base coat, I used Save the Nail Repair and Rescue Base coat as my nails are quite weak (£7.50, here), a french white polish, I'm using Collection 2000 French Manicure in French White (£2.99, availbile from Boots and Superdrug, but irritatingly not online) and a topcoat. I'm using Seche Vite Dry Fast Topcoat (£10.50, here), a nail file and/or buffer, a makeup sponge and some sort of non-porus surface, I just use old packaging.
The first step is to prep your nails. File them into a shape you like, and then I always use a nail buffer to give a smoother finish, but you could skip this. Apply your base coat.
Apply your nude polish, using enough coats for it to be opaque, though if your nail line shows it doesn't matter too much.
Once that is completely dry, you need to pour out a little bit of your nude polish onto the plastic. Dip the edge of your sponge into it and then dab it off on a clean part of the plastic. If the sponge is too wet you wont get a nice gradient, just a harsh white patch, so this bit is important! Start to stipple the sponge onto the tips of your nails. concentrate on getting a subtle wash of colour at this stage, and dont worry if your tips aren't completely white yet. Once you have done this on all 10 fingers, you can go back and use the sponge just on the very ends of your nails to make the tips fully white. Apply your topcoat and you're good to go!
Using a matte topcoat can make the gradient even more fuzzy and soft looking, it's a really pretty effect.
The steps are really very easy, but I'll go through them anyway. You're going to need a nude nail polish, I used Maybelline Everstrong in Ivory Rose (£4.09, here), a base coat, I used Save the Nail Repair and Rescue Base coat as my nails are quite weak (£7.50, here), a french white polish, I'm using Collection 2000 French Manicure in French White (£2.99, availbile from Boots and Superdrug, but irritatingly not online) and a topcoat. I'm using Seche Vite Dry Fast Topcoat (£10.50, here), a nail file and/or buffer, a makeup sponge and some sort of non-porus surface, I just use old packaging.
The first step is to prep your nails. File them into a shape you like, and then I always use a nail buffer to give a smoother finish, but you could skip this. Apply your base coat.
Apply your nude polish, using enough coats for it to be opaque, though if your nail line shows it doesn't matter too much.
Using a matte topcoat can make the gradient even more fuzzy and soft looking, it's a really pretty effect.
Labels:
Collection 2000,
easy,
Maybelline,
nail art,
Nail colour,
nail polish,
Nails,
Nude,
tips,
topcoat,
Tutorial
Friday, 11 May 2012
Gradient Manicure Barry M Racing Green with Nicole by OPI Glitter in my Stocking
Today I did this gradient manicure with two new polishes that I recently acquired. The Barry M Racing Green I've had my eye on for ages, I don't know why I didn'y get it earlier really, these polishes have such reliably good formulas and they certainly don't break the bank at £2.99. The glitter polish I recieved in my swap with Marla, but I forgot to include it in my swap haul! (D'oh!)
It's such a pretty colour, and the glitter is really dense, I've used it for an alternative french tip colour and it's absolutely gorgeous with that paired with Barry M Peach Melba. for this manicure however, I applied it with a tiny brush and dragged it down towards the base of my nail of a gradient effect.
Sunday, 12 February 2012
Rolexes... the EDIBLE kind?
I know it's kind of unusual for me to feature a recipe on here, but it's something i'm keen to do more regularly.
you will need:
2 cups of plain flour
1 cup of water
1 teaspoon of salt
1 tablespoon of olive oil
some sunflower or other clear oil for frying
4-6 eggs
salt and pepper
shedded vegetables. these could be anything, though when i was in uganda it was cabbage and carrot.
start by making the chapattis. i just used a mug for the measurements. combine the flour, water, salt and olive oil, and knead into a smooth dough. this is easier if you split it in two. if you find that your dough is not completely smooth, start rolling and re-rolling, and it will improve. this recipe makes 2 good sized chapattis, so roll half the dough out and fold it into quarters, and then repeat, switching between the two portions. try and keep them as round as possible, and approximately the same size as your frying pan. you will find that they sring back a lot as you roll, but persevere and they will get bigger and flatter. you want to roll them as thinly as possible, but not bigger than your pan.
once you have rolled both of your chapattis, prep your eggs. break 2 or 3 of them into a cup (preferably the same one you used for measuring your flour and water, less washing up), depending on how many eggs you are using, add your veggies, and season well. its hard to oversalt this, and they will taste bland if you don't put enough in.
pour enough oil into the pan to completely cover the surface. put it on a high heat and wait until it is bubbling to add your first chapatti.(you can test it by just dipping the edge into the oil. if it sizzles straight away, it's hot enough) when it's hot, place the first chapatti in the pan, and turn it to evenly distrubute the heat. you can also press it out a little further at this point. lip your chapatti after about a minute. it should be golden brown and patchy where the layers have bubbled up. remove from the pan after about another 30 seconds. cook the other one in the same way, and remove to kitchen paper.
turn the heat down to medium. when you start cooking the eggs everything happens kind of at once, so make sure you've got a plate handy, and a knife and fork! when i make these i tend to make 2 chapattis and only one lot of eggs, and use the other chapatti at another time. if you want to make both of them now, you will need to have to cups of eggs and veg ready to go, or the first one will get cold while you prep the second one. pour your eggs into the pan, and shake the pan slightly, to spead them out. when you can see the white cooked layer of eggs all over the bottom of the pan, grab a chapatti, and place it bownest-side-down on top of the eggs. carefully slide a fish slice underneath, and flip the whole lot over. after only about a minute, slip it out of the pan and onto a plate, and roll it up, with the eggs inside and chapatti outside. you can put slices of tomato or other fillings in before you roll it up if you want to.
enjoy the fruits of your labour!
let me first explain to those of you who don't know what a rolex is. it's a snack or light meal comprised of chapatti, vegetables and eggs. apparently it was originally known as 'roll eggs' but when this is said quickly in a ugandan accent it sounds like rolex, and so the name has evolved.
2 cups of plain flour
1 cup of water
1 teaspoon of salt
1 tablespoon of olive oil
some sunflower or other clear oil for frying
4-6 eggs
salt and pepper
shedded vegetables. these could be anything, though when i was in uganda it was cabbage and carrot.
start by making the chapattis. i just used a mug for the measurements. combine the flour, water, salt and olive oil, and knead into a smooth dough. this is easier if you split it in two. if you find that your dough is not completely smooth, start rolling and re-rolling, and it will improve. this recipe makes 2 good sized chapattis, so roll half the dough out and fold it into quarters, and then repeat, switching between the two portions. try and keep them as round as possible, and approximately the same size as your frying pan. you will find that they sring back a lot as you roll, but persevere and they will get bigger and flatter. you want to roll them as thinly as possible, but not bigger than your pan.
once you have rolled both of your chapattis, prep your eggs. break 2 or 3 of them into a cup (preferably the same one you used for measuring your flour and water, less washing up), depending on how many eggs you are using, add your veggies, and season well. its hard to oversalt this, and they will taste bland if you don't put enough in.
pour enough oil into the pan to completely cover the surface. put it on a high heat and wait until it is bubbling to add your first chapatti.(you can test it by just dipping the edge into the oil. if it sizzles straight away, it's hot enough) when it's hot, place the first chapatti in the pan, and turn it to evenly distrubute the heat. you can also press it out a little further at this point. lip your chapatti after about a minute. it should be golden brown and patchy where the layers have bubbled up. remove from the pan after about another 30 seconds. cook the other one in the same way, and remove to kitchen paper.
turn the heat down to medium. when you start cooking the eggs everything happens kind of at once, so make sure you've got a plate handy, and a knife and fork! when i make these i tend to make 2 chapattis and only one lot of eggs, and use the other chapatti at another time. if you want to make both of them now, you will need to have to cups of eggs and veg ready to go, or the first one will get cold while you prep the second one. pour your eggs into the pan, and shake the pan slightly, to spead them out. when you can see the white cooked layer of eggs all over the bottom of the pan, grab a chapatti, and place it bownest-side-down on top of the eggs. carefully slide a fish slice underneath, and flip the whole lot over. after only about a minute, slip it out of the pan and onto a plate, and roll it up, with the eggs inside and chapatti outside. you can put slices of tomato or other fillings in before you roll it up if you want to.
enjoy the fruits of your labour!
Wednesday, 11 January 2012
Living in halls; top 5 tips
hey guys. i know this post is a little random and unrelated to my usual blogging content, but i have lost my blogging mojo recently and I i'm trying to easy myself back into it by just blogging about things that are important to me at the moment.
Tip number 1: put photos EVERYWHERE. as much as you might think you cant wait to get away from your parents, you will miss them. wherever you move in there WILL be a pinboard, so use that, but i also wanted some framed pictures on the wall, so I mounted these using Command Picture Strips, though to be honest I think the Hooks are more versatile and useful.
Tip 2; check your inventory and DON'T DAMAGE ANYTHING.
accidents happen, but you need to be careful not to cause damage that could loose you your deposit, such as marking the walls by sticking things up using blu-tack or sellotape. command strips as mentioned above are availible from Rymans and WHSmith stores, and white tack is a better alternative to the blue version. if something is broken when you first move in, make sure you report it straight away; my university only allowed you 48 hours to report any damage or you would be blamed and charged for it.
be careful with the fixtures and fittings and don't try to change anything major. even changing a lightbulb yourself can sometimes be a breach of your accomodation agreement. the best thing to do if you have a problem is to speak to the relvant people on campus, who are most likely to be the residential services team, and bug them until they sort it out for you.
Tip 3; Get creative.
when i moved in to my flat, i found that the door to my bathroom is magnetic, and i use this to the full. i have pictures of my friends and family stuck up there, and i also have a load of ransom note letter magnets, which were hugely succesful for me. when people come to visit they love to leave a little message on my door, even if it is something a bit immature (see top left of picture!!). while not every room is going to have a magnetic door, there will certainly be little things that you can use to their full potential, and all it takes to find them is a little time getting to know your room.
Tip 4; maximise your storage
if you're a bit of a makeup junkie like me, chances are you'll have a bit of trouble storing everything compactly. while it's lovely to have eveything on display, that's just not practical in such a small space. these drawer dividers from ikea are great for makeup and small clothing items, like underwear.
i keep palettes in a metal mesh letter holder i got from WHSmith, and i store brushes in mugs i recieved as gifts or freebies. this is a view of my desk, and you can see that keep my nail polishes on a small ledge that houses electrical cables. it is only just deep enough for the bottles, and otherwise would just be wated space.
my final tip relates to food. small, grabable food should be kept in your room, not in the kitchen. A, because when you want that sort of thing you don't want to have to go far to get it, and B, because that is the typ of food that is most likely to get nabbed by other people you live with. I trust everyone i live with, but in the past, when i've had snacks in the kitchen, tey have gone missing, so its best to keep a snack box close at hand in your room! it's also useful if, like me, you have to head out to work and you need to have something with you to get you through your shift. i work very antisocial hours and it means that i basically never get regular meals, so i'm always grabbingthings out of here before i run out the door.
i hope you enjoyed, and i promise i'm trying to get back to blogging properly as soon as possible.
what are YOUR top tips for uni life?
Sunday, 27 November 2011
First Festive Manicure of the Season!
hey ladies! just a quick post to show you todays manicure!
I bought Barry M's red glitter a while back to use as a topcoat over a taupe colour that i thought needed spicing up a bit. It was totally useless for that purpose because it is virtually opaque. I was a bit dissapointed with it for that reason but i have since come to realise that opaque glitters are really something of a rarity! This shade just seemed so perfect for the Christmas season, so I thought I'd crack it out again.
products used: Save the Nail Repair and Rescue Treatment (not pictured) (here), NYC In a New York Colour Minute Quick Dry Nail Polish in Chelsea (here), Barry M Nail Paint in 150 Red Glitter (here) and Seche Vite Topcoat (here)
with flash. please enlarge to view the beautiful sparkles!!!
without flash.
so what do YOU think? is it too early for christmas nails?
Love, Lucy xx
I bought Barry M's red glitter a while back to use as a topcoat over a taupe colour that i thought needed spicing up a bit. It was totally useless for that purpose because it is virtually opaque. I was a bit dissapointed with it for that reason but i have since come to realise that opaque glitters are really something of a rarity! This shade just seemed so perfect for the Christmas season, so I thought I'd crack it out again.
products used: Save the Nail Repair and Rescue Treatment (not pictured) (here), NYC In a New York Colour Minute Quick Dry Nail Polish in Chelsea (here), Barry M Nail Paint in 150 Red Glitter (here) and Seche Vite Topcoat (here)
with flash. please enlarge to view the beautiful sparkles!!!
without flash.
so what do YOU think? is it too early for christmas nails?
Love, Lucy xx
Friday, 18 November 2011
Blushing, ME?
hey girls! today i'm bringing you a face of the day post, which i'm actually SO happy with.
i didn't use any blush at all, and just relied on bronzer, which i never usually use. i was always a bit scared of bronzer because i'm so pale, but my i'm loving NYC mosaic bronzer (availible here) at the moment! i apply it with a big fluffy brush in light strokes, building up the layers. the brush i use is really really soft and not very firm (its from the fraulien 38 set, availible here) and i previously didn't like it, as it laid down so little colour, but it's just perfect for bronzer!
top two pictures without flash, bottom two with flash
face: Rimmel stay matte in 01 mixed with Barry M foundation creme in white, NYC colour wheel mosaic face powder in all over bronze, Collection 2000 lasting perfection concleaer in 01, benefit powderflage (under my eyes), Rimmel clear complexion powder in transparent, Ruby and Millie cream highlight
Eyes: MAC paint pot in Rubenesque, MAC eyeshadow in Satin Taupe, Sleek ink pot Gel Liner in black, NYC High definition Seperating Mascara in Black (underneath), Max Factor False Lash Effect Fusion mascara in Black
Lips; Sleek Pout Paint in Port.
i love this lip colour so much, which is why i included the pictures with flash, as the lip colour is much truer in them, though it makes me look excesively pale. its a really deep fuscia pink, bright but dark at the same time
i love how this brinzer looks so much!! let me know what you think!
i didn't use any blush at all, and just relied on bronzer, which i never usually use. i was always a bit scared of bronzer because i'm so pale, but my i'm loving NYC mosaic bronzer (availible here) at the moment! i apply it with a big fluffy brush in light strokes, building up the layers. the brush i use is really really soft and not very firm (its from the fraulien 38 set, availible here) and i previously didn't like it, as it laid down so little colour, but it's just perfect for bronzer!
top two pictures without flash, bottom two with flash
face: Rimmel stay matte in 01 mixed with Barry M foundation creme in white, NYC colour wheel mosaic face powder in all over bronze, Collection 2000 lasting perfection concleaer in 01, benefit powderflage (under my eyes), Rimmel clear complexion powder in transparent, Ruby and Millie cream highlight
Eyes: MAC paint pot in Rubenesque, MAC eyeshadow in Satin Taupe, Sleek ink pot Gel Liner in black, NYC High definition Seperating Mascara in Black (underneath), Max Factor False Lash Effect Fusion mascara in Black
Lips; Sleek Pout Paint in Port.
i love this lip colour so much, which is why i included the pictures with flash, as the lip colour is much truer in them, though it makes me look excesively pale. its a really deep fuscia pink, bright but dark at the same time
i love how this brinzer looks so much!! let me know what you think!
Labels:
Barry M,
blush,
concealer,
cream shadow,
easy,
eyeliner,
eyes,
Foundation,
lip colour,
MAC,
makeup,
paint pots,
shadow,
sleek,
smokey
Monday, 24 October 2011
DIY leopard print nails
hey ladies, today i'm coming to you with a tutorial, to create these awsome leopard print style nails!
once you've decided on your colour scheme, (im using pink and blue but mot colour combinations would work!) the first step is to paint your base coat and base colour. i didn't actually do a base coat because i've got acrylics at the moment, but if you're doing this look on your natural nails, a base coat will help it last longer and be smoother. i'm using Barry M's Blue Moon as my base colour.
after you've got your base colour down, you need to get a contrasting colour (i'm using Barry M's Pink flamingo) and get your splodge on! try not to dab straight down as this will leave little drops and bumps, its better to do a little stroke of the brush. don't worry about being neat, different sizes and shapes are good!
having done your contrasting splodges, you need to get your hands on a back liquid eyeliner. i'm using liquid eyeliner rather than black polish for a few reasons; 1, its much easier to fix if you make a mistake and you don't have to start again with polish remover. 2, i find it's much more opaque than the black polish i have and 3, the fine brush makes it easier to apply than a polish brush.
the eyeliner i'm using is Sleek's dip it eyeliner in black. it has a 'felt tip' style brush, which i much prefer to the floppier bristle brush ones. you need to draw broken lines around each dot, two or three for each one. if you have any bare patches on your nail, you can also draw on some little 'c' shapes to fill them in.
lastly you need to seal in your design with a topcoat. i'm using Seche vite fast dry topcoat.
it helps to look at a picture of a leopard to see how the 'rosettes' look (which is what we're trying to recreate). i'm lucky enough to have a little leopard living at my parents house, so i took my inspiration from him :)
hope you liked this tutorial lovelies!
let me know your ideas for other colour combinations, i want to try them out!
Love, Lucy xxx
once you've decided on your colour scheme, (im using pink and blue but mot colour combinations would work!) the first step is to paint your base coat and base colour. i didn't actually do a base coat because i've got acrylics at the moment, but if you're doing this look on your natural nails, a base coat will help it last longer and be smoother. i'm using Barry M's Blue Moon as my base colour.
after you've got your base colour down, you need to get a contrasting colour (i'm using Barry M's Pink flamingo) and get your splodge on! try not to dab straight down as this will leave little drops and bumps, its better to do a little stroke of the brush. don't worry about being neat, different sizes and shapes are good!
having done your contrasting splodges, you need to get your hands on a back liquid eyeliner. i'm using liquid eyeliner rather than black polish for a few reasons; 1, its much easier to fix if you make a mistake and you don't have to start again with polish remover. 2, i find it's much more opaque than the black polish i have and 3, the fine brush makes it easier to apply than a polish brush.
the eyeliner i'm using is Sleek's dip it eyeliner in black. it has a 'felt tip' style brush, which i much prefer to the floppier bristle brush ones. you need to draw broken lines around each dot, two or three for each one. if you have any bare patches on your nail, you can also draw on some little 'c' shapes to fill them in.
lastly you need to seal in your design with a topcoat. i'm using Seche vite fast dry topcoat.
it helps to look at a picture of a leopard to see how the 'rosettes' look (which is what we're trying to recreate). i'm lucky enough to have a little leopard living at my parents house, so i took my inspiration from him :)
hope you liked this tutorial lovelies!
let me know your ideas for other colour combinations, i want to try them out!
Love, Lucy xxx
Tuesday, 11 October 2011
Lucy on a schedule?! (and NOTD)
hey ladies!! i'm so sorry i've been so scatty recently, but i am back on the straight and narrow now and will be blogging on a scedule! i don't have lectures on mondays, wednesdays or fridays, so basically, i will be posting at least twice a week on two of those days.
i was going to designate it to mondays and fridays as wednesday is when me and my flatmate danni are both off uni and go on a wednesday adventure, into the streets of london. thing is, i thought i might actually want to blog about that! and seeing as our wednesday adventures quite often end up as days out shopping, they could make a good feature!
i was also going to say i would do one particular type of post on a particular day, eg a makeup tutorial on a monday but i thought that could end up a bit clinical. what do you think?
as this post is a little un-beauty related, i thought i'd leave you with a snap of my futuristic nails!
these were done using boots 17 magnetized nail polish (£5.99, but currently on promotion at £4.99) in the green shade. as far as i can tell they dont have shade names (dont they realise we hate that?!), so its just 'the green one'
hope y'all liked! have you tried magnetic nails??
Love, Lucy xx
i was going to designate it to mondays and fridays as wednesday is when me and my flatmate danni are both off uni and go on a wednesday adventure, into the streets of london. thing is, i thought i might actually want to blog about that! and seeing as our wednesday adventures quite often end up as days out shopping, they could make a good feature!
i was also going to say i would do one particular type of post on a particular day, eg a makeup tutorial on a monday but i thought that could end up a bit clinical. what do you think?
as this post is a little un-beauty related, i thought i'd leave you with a snap of my futuristic nails!
these were done using boots 17 magnetized nail polish (£5.99, but currently on promotion at £4.99) in the green shade. as far as i can tell they dont have shade names (dont they realise we hate that?!), so its just 'the green one'
hope y'all liked! have you tried magnetic nails??
Love, Lucy xx
Labels:
17,
blogs,
boots,
easy,
magnetic nails,
makeup,
nail polish,
offer,
promotion,
schedule,
wednesday adventure
Friday, 20 May 2011
Body Chain Jewelry
hey guys! i recently discovered American brand, Armor Jewelry, and i fell in love with their designs.
the only problem is that a) they are an american company so getting anything delivered here would be costly, if even possible, and b) they are waaaay out of my price range.
so, taking inspiration from this deisgn
and this project on cut out and keep, i bought this nacklace from Ann Summers to make my on version.
it didn't take me too long, and cost about £10 in total because i actually bought the necklace on ebay, not directly from ann summers. i don't know how i feel about the back of it, and i may change it later, but i am really pleased with the overall effect, and i plan to make a few more ites inspitred by armor's collection
side view:
and a back view. most of you won't know this abou me, but i actually have a scoliosis, whihc means that my spine is curved into an S shape, which makes my shoulders uneven. i hate how much it shows in these pictures, but i dont often look at my back, so i geuss i'm not used to seeing what it relly looks like!
what do you think? do you like Armor jewelry? What do you think of body chains in general?
Lucy, xx
the only problem is that a) they are an american company so getting anything delivered here would be costly, if even possible, and b) they are waaaay out of my price range.
so, taking inspiration from this deisgn
it didn't take me too long, and cost about £10 in total because i actually bought the necklace on ebay, not directly from ann summers. i don't know how i feel about the back of it, and i may change it later, but i am really pleased with the overall effect, and i plan to make a few more ites inspitred by armor's collection
side view:
and a back view. most of you won't know this abou me, but i actually have a scoliosis, whihc means that my spine is curved into an S shape, which makes my shoulders uneven. i hate how much it shows in these pictures, but i dont often look at my back, so i geuss i'm not used to seeing what it relly looks like!
what do you think? do you like Armor jewelry? What do you think of body chains in general?
Lucy, xx
Subscribe to:
Posts (Atom)