Showing posts with label nail art. Show all posts

Friday, 14 September 2012

Nailed: OPI Mermaid's Tears with Your Royal Shine-ness

Again, apologies for the high number of nail related posts!

I absolutely love this mani, and didn't want to take it off! Definitely one I'll be repeating. OPI Mermaid's Tears (Pirates of the Carribean collection) with Your Royal Shine-ness (Serena Glam Slam) on the tips. Application was fine, tips were done with a small paintbrush, all smoothed out with a coat of Seche Vite. Removal was without issues :)

Saturday, 8 September 2012

Nailed: Barry M Neon Pink

I'm so sorry I've been MIA the past couple of weeks, I've been staying with a friend in London while I looked for a new flat/house to live in for my second year at uni, and I let my camera at my parents house. I've got it back now and found a house, thank God!

Anyway, recently I was in Tantrum in Westfield in Stratford, where they do nail art stuff, and recently seem to have added a lot more makeup and jewelry to their stock. They also do nail art for you in store, which I need to check out some time soon!

They had a big Barry M stand and seemed to stock the entire line of Barry M makeup. I was very excited about that as I have a bit of an obsession with Barry M Nail Paints, but I have the most popular ones which tend to be stocked at smaller stands! I found a few polishes that I don't already own, but it was the neons that really caught my eye, and I came away with Neon Pink and a blue nail art pen by Tantrum. I would link to their website but there isn't much of it, you can find their facebook page here

Neon Pink is a really bright, almost, but not quite, highlighter pink. The thing that makes it slightly more interesting than a flat neon is that it has a very fine blue shimer to it, which accentuates its brightness. If you enlarge the photo the shimmer becomes much more apparent. It was opaque in 2 coats but I'm a 3 coat girl and used 3 for a perfect finish. One thicker coat could even have given adequate coverage.

Monday, 30 July 2012

Bow Manicure from The Illustrated Nail

This is super old, but I just realised that I never posted it! A few months ago, a new Lola and Grace store opened at Westfield Stratford, and had loads of things going on the day they opened. There was champagne and cupcakes, a jewelry swap, free manicures and a DJ and party in the evening I think.

My friend Leonie and I went to check it out, and we arrived just as the girls from The Illustrated Nail turned up! We booked in for the first appointment and went to shop while they got set up. When we came back there was a huge queue, but as we had booked in we got to slot right in! She created a beautiful bow design on my nails and used Essie Mint Candy Apple as a base colour. I wish I had the skills to do nail art like this!

Thursday, 21 June 2012

Nailed: French Gradient with Tutorial

Today I decided to do something a little bit different with my nails. I like the classic french manicure but I sometimes think it can look a little bit too prefect, and I know a lot of people think it can look tacky (though personally I like it!). This look is softer and is inherently easier than doing your own french manicure as well!

The steps are really very easy, but I'll go through them anyway. You're going to need a nude nail polish, I used Maybelline Everstrong in Ivory Rose (£4.09, here), a base coat, I used Save the Nail Repair and Rescue Base coat as my nails are quite weak (£7.50, here), a french white polish, I'm using Collection 2000 French Manicure in French White (£2.99, availbile from Boots and Superdrug, but irritatingly not online) and a topcoat. I'm using Seche Vite Dry Fast Topcoat (£10.50, here), a nail file and/or buffer, a makeup sponge and some sort of non-porus surface, I just use old packaging.

The first step is to prep your nails. File them into a shape you like, and then I always use a nail buffer to give a smoother finish, but you could skip this. Apply your base coat.

 Apply your nude polish, using enough coats for it to be opaque, though if your nail line shows it doesn't matter too much.

Once that is completely dry, you need to pour out a little bit of your nude polish onto the plastic. Dip the edge of your sponge into it and then dab it off on a clean part of the plastic. If the sponge is too wet you wont get a nice gradient, just a harsh white patch, so this bit is important! Start to stipple the sponge onto the tips of your nails. concentrate on getting a subtle wash of colour at this stage, and dont worry if your tips aren't completely white yet. Once you have done this on all 10 fingers, you can go back and use the sponge just on the very ends of your nails to make the tips fully white. Apply your topcoat and you're good to go!

Using a matte topcoat can make the gradient even more fuzzy and soft looking, it's a really pretty effect.

Wednesday, 6 June 2012

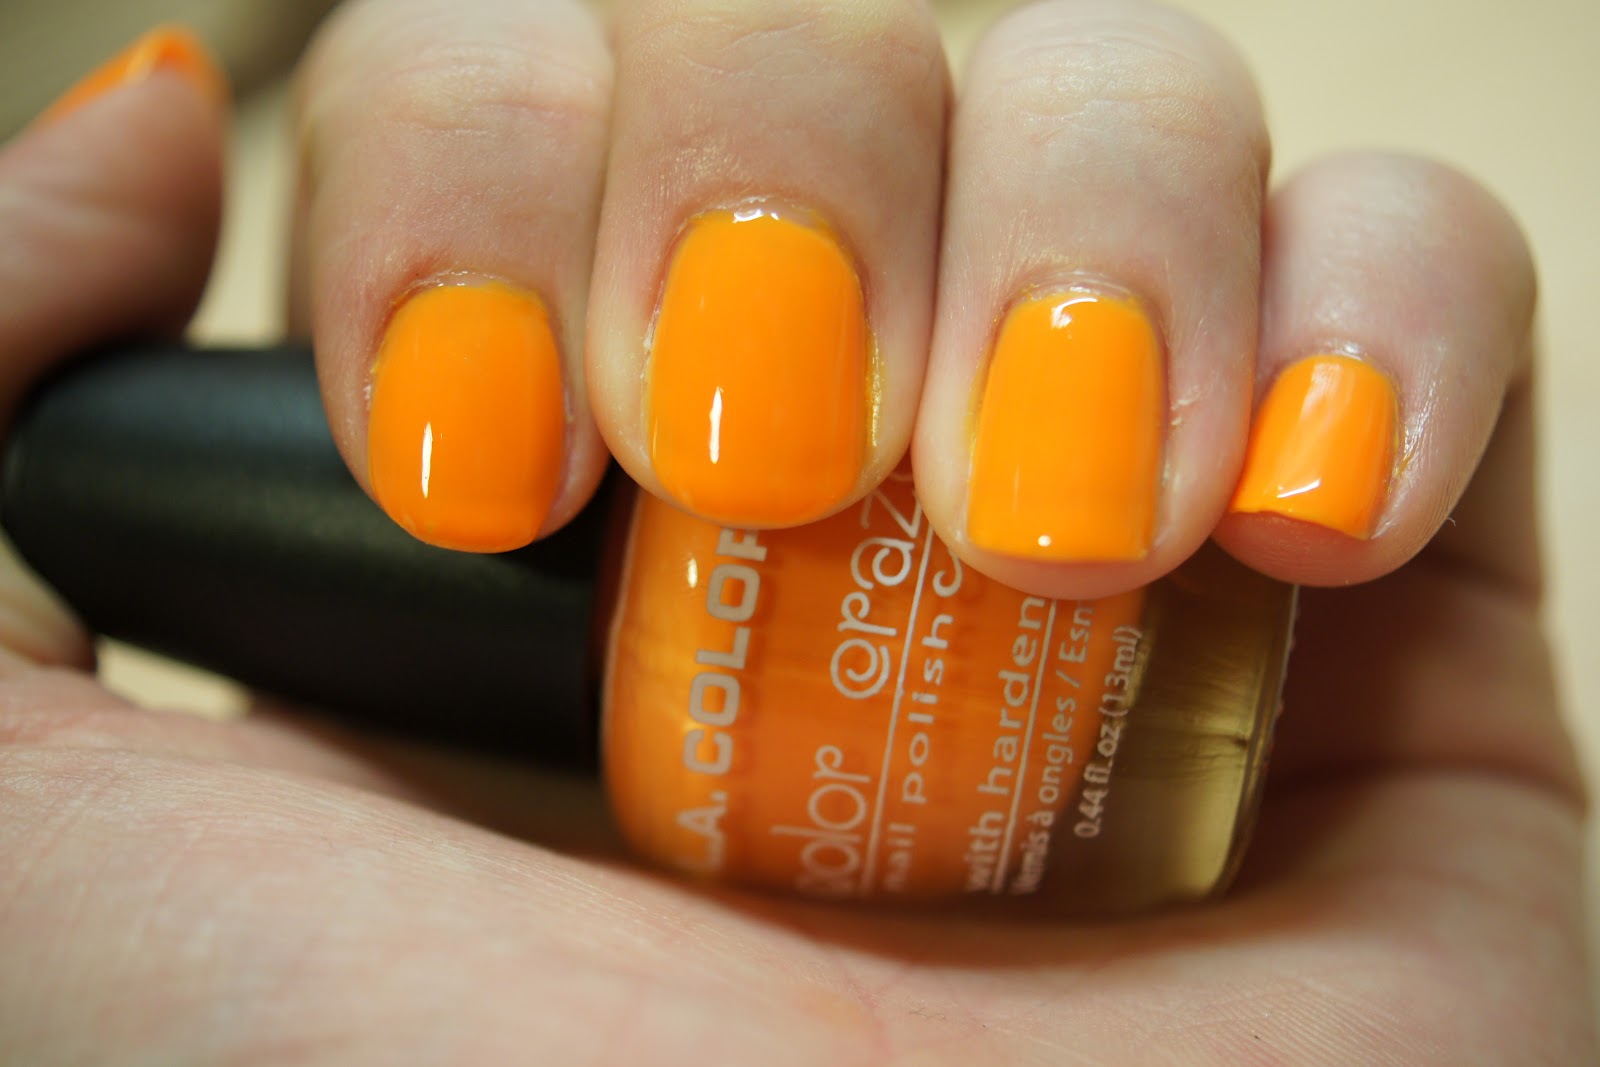
Nailed: Shock.

Since the weather has finally warmed up, I've been able to crack out the summer brights!

This is by LA Colors from their Color Craze line in the shade Shock. I got this for the bargainous price of £1 from Beauty Base in Westfield Stratford.

The formula was not great. For a £1 polish, I didn't expect great things, but the other polishes I have from this line have had much better formulas, so maybe I've been spoilt by them in the past. This polish was really very sheer, the abover photo is with 5 coats, and my nail line was still visible. The colour is lovely, but if i was going to use this again I think I would try it over a white base. Overall it's not a bad polish, but be prepared to have to work quite hard to get it to look like the bottle. Removal was without problems.


Friday, 11 May 2012

Gradient Manicure Barry M Racing Green with Nicole by OPI Glitter in my Stocking

Today I did this gradient manicure with two new polishes that I recently acquired. The Barry M Racing Green I've had my eye on for ages, I don't know why I didn'y get it earlier really, these polishes have such reliably good formulas and they certainly don't break the bank at £2.99. The glitter polish I recieved in my swap with Marla, but I forgot to include it in my swap haul! (D'oh!)

It's such a pretty colour, and the glitter is really dense, I've used it for an alternative french tip colour and it's absolutely gorgeous with that paired with Barry M Peach Melba. for this manicure however, I applied it with a tiny brush and dragged it down towards the base of my nail of a gradient effect.

Wednesday, 11 April 2012

DIY Kaviar Manicure tutorial

hey girls! sorry ive been so absent lately, but I've got lots of content coming soon, like a haul from a swap i did with Marla!

anyway, today I had a bit of fun with my nails. I had actually done this before, but used a topcoat on top which caused the colours to run an look super ugly! I have seen a lot about the Ciate Caviar Manicure kits that have recently gone on sale, and I was excited but also kindof annoyed about it. The pricetag for the kits, (which is the princely sum of £18!) is a bit ridiculous in my humble opinion. I was excited because it's a relatively new turn for nail art (though i'm sure quite a few people have tried this before, myself included) but the kits include a bottle of polish, a bottle of microbeads (or 'caviar pearls' as I think they have dubbed them)  a funnel and a plastic tray.


I think it's expensive for what it is. I have a large number of different colours of microbeads that I bought ages ago to make a blinged out iphone case.
 I have 14 different colours of beads, and together they cost less than a Ciate kit! So here is a quick DIY tutorial on how to get the look, without breaking the bank!

You will need:

Nail polish. I used Barry M nail paint in Peach Melba, but you can use any colour you fancy!

Microbeads. mine are Micro Beedz by Art Accentz, which I got from a shop called Crafty Destination in Southampton. They are by far the cheapest I have found, at £1 a pot or £4.99 for a pack of six different colours. They have a website, which you can find here. I also mixed the colours you see above in the small pot on the left. This gives a more dimensional look, but you could just use one colour.

Some sort of scoop. The one I used is from a pack of sweets from topshop, but a teaspoon will do fine!

A piece of paper, or a paper plate. I folded the edges of the paper to make a kind of tray so I could save any stray beads that didn't stick to the nail.

A topcoat. This is optional, but I used Seche Vite to actually stick the beads down, because it can stand a thick coat and dries quickly, though you could just use your coloured polish if you wish.

Right, the first thing ou need to do is paint your nails. I just wanted to do one accent nail on each hand, but you could do all of them. Decide which nail/s you are going to apply the beads to.

Take your seche vite, and apply to one nail. Very quickly, spoon some beads over the nail and tap them down. You will want to have the containers already open and the spoon at hand to do this! Work over your paper tray or plate.

Continue until all of your nails are done! its really that simple. Then you can crease your paper tray or plate in the middle, and use it to pour the remaining beads back into the pot. This look isnt very hard wearing, but should last a few days if you're careful with it!


the finished look.


would anybody be interested in seeing a tutorial for how i made my phone case?

enjoy!


Sunday, 27 November 2011

First Festive Manicure of the Season!

hey ladies! just a quick post to show you todays manicure!

I bought Barry M's red glitter a while back to use as a topcoat over a taupe colour that i thought needed spicing up a bit. It was totally useless for that purpose because it is virtually opaque. I was a bit dissapointed with it for that reason but i have since come to realise that opaque glitters are really something of a rarity! This shade just seemed so perfect for the Christmas season, so I thought I'd crack it out again.

products used: Save the Nail Repair and Rescue Treatment (not pictured) (here), NYC In a New York Colour Minute Quick Dry Nail Polish in Chelsea (here), Barry M Nail Paint in 150 Red Glitter (here) and Seche Vite Topcoat (here)


with flash. please enlarge to view the beautiful sparkles!!!


without flash.


so what do YOU think? is it too early for christmas nails?

Love, Lucy xx

Monday, 24 October 2011

DIY leopard print nails

hey ladies, today i'm coming to you with a tutorial, to create these awsome leopard print style nails!

once you've decided on your colour scheme, (im using pink and blue but mot colour combinations would work!) the first step is to paint your base coat and base colour. i didn't actually do a base coat because i've got acrylics at the moment, but if you're doing this look on your natural nails, a base coat will help it last longer and be smoother. i'm using Barry M's Blue Moon as my base colour.


after you've got your base colour down, you need to get a contrasting colour (i'm using Barry M's Pink flamingo) and get your splodge on! try not to dab straight down as this will leave little drops and bumps, its better to do a little stroke of the brush. don't worry about being neat, different sizes and shapes are good!
having done your contrasting splodges, you need to get your hands on a back liquid eyeliner. i'm using liquid eyeliner rather than black polish for a few reasons; 1, its much easier to fix if you make a mistake and you don't have to start again with polish remover. 2, i find it's much more opaque than the black polish i have and 3, the fine brush makes it easier to apply than a polish brush.

the eyeliner i'm using is Sleek's dip it eyeliner in black. it has a 'felt tip' style brush, which i much prefer to the floppier bristle brush ones. you need to draw broken lines around each dot, two or three for each one. if you have any bare patches on your nail, you can also draw on some little 'c' shapes to fill them in.


lastly you need to seal in your design with a topcoat. i'm using Seche vite fast dry topcoat.

it helps to look at a picture of a leopard to see how the 'rosettes' look (which is what we're trying to recreate). i'm lucky enough to have a little leopard living at my parents house, so i took my inspiration from him :)


hope you liked this tutorial lovelies!

let me know your ideas for other colour combinations, i want to try them out!

Love, Lucy xxx